How to Partition a Hard Disk in Windows 7 Operating System – Whenever you try to install new Windows Operating System on your PC/Laptop, you can see an option to divide your hard disk into parts. So partition means the division on Hard Disk into Multiple Logical units to store the data. Partition of Hard Disk makes the user store the data on your Windows PC/Laptop easily and you can retrieve them easily. If you do not have any partitions then you may get confused with the data which you have stored on your Windows OS. Storing data on different storage partitions can save the data from corrupt. So if you do not know the process to make partitions on your Hard Disk then follow the complete article.
Steps to Partition a Hard Disk on Windows 7 Operating System
Follow the step by step guide to partition your Hard Disk on your Windows 7 Operating System.
- Type Computer Management in the Start Menu and click enter. You can see the options related to the Computer Management.
- Click on Computer Management and then you can see a new window with all the options in it.
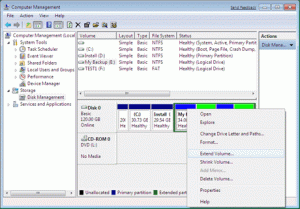
- Under Computer Management, choose Disk Management in the left pane as you can see all the list of partitions on your Windows OS.

- Now to make much more partitions, right click on the partitions and then select Shrink Volume option.
- Like if your Hard Disk is of 1TB space and divided into two drives C: and D: in which C: Drive has 750 GB and D: has 500GB.
- Right-Click on the C: Drive and then Click on Shirk Volume.
- You can see a new window to set the volume of the drive. Enter the volume and then click on Shrink.
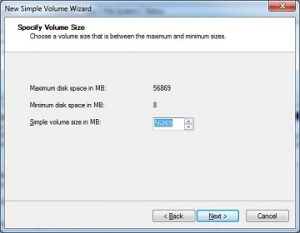
- Now you can see another unallocated partition on your Disk Management Window. Right Click on it and then select New Simple Volume option.
- Click on Next and then select the volume size and then click Next.

- Assign the Drive Letter Name and then Click Next.
- Click on Format this volume with this settings and choose File System as NTFS, Allocation unit size as Default, and Volume Label as New Volume.
- Click Next and click on Finish.
Now you need to format your new volume in the Disk Management window. Right-click on the new window and then click on format disk option. Now you need to click on Start button and then you can see a new popup window Click OK button.
If you do everything correctly, then you can see the new partition name on your Windows Operating System. You can also divide your hard disk into as many drives you want in the same way. Divide the partition into as many as folders you want to have a safe distribution of data on your Windows Operating System. If you are allocated to two partitions then you may find difficult to store the data on your Windows Operating System.
