How to Enable remote desktop windows 10 – Remote Desktop Protocol is an inbuilt option from Windows Operating System to connect to other monitors. Remote Desktop Protocol is much used on Windows XP Operating System as to share files, data, and documents from one monitor to another monitor. But as the technology, as increased, many users started using third-party applications to share files and documents between the computers. Even if you are looking to use Remote Desktop Protocol on your Windows 10 Operating System then you can follow the complete article and then implements on your PC or Laptop.

Remote Desktop Protocol makes easy to connect between the monitors as it is completely a Windows Environment. If you are completely a windows users, then you can use Remote Desktop Steps to connect between the computers.
How to Enable Remote Desktop for Windows 10 Operating System
Follow the complete steps mentioned below to enable Remote Desktop on your Windows Operating System.
- Open your Windows 10 Operating System and then click on the Cortana. Type Remote Settings in the search box and then click enter.
- Now it gives the results related to Remote Desktop.
- Click on Allow Remote Access to your Computer option.
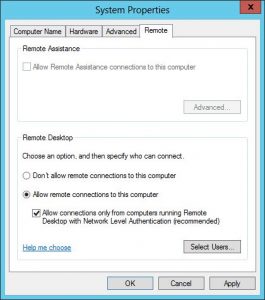
- You can see that a new window will be opened with System Properties in it.
- Click on the Remote Lable which is the last label. Now, you can see a checkbox called “Allow Remote Assistance Connections to this Computer”. Select the box.
- You can see another checkbox below as “Allow Remote Connections to this computer”. Check the box and also check the box which has “Network Level Authentication for the better security purpose”.

- Click Apply and then Click OK.
Now you need to choose between the applications to connect remotely between the computers. You will have Traditional App or Remote Desktop Universal App to use. So to make it easy am using the Windows Home Server on my home network. Even am using an additional application to connect remote desktops.
So if you have many PCs at your location, then you can use Advanced IP Scanner Application which is a free utility to use and the best preferred.
Download the Application and then enter the IP Address of the PC. Click on Connect. Now you need to enter the Username and Password of your system profile to connect. Do not forget to check Remember my credentials as you are going to use as a remote desktop.
Sometimes you may get a message as Couldn’t Able to Connect need to verify the identity of the remote PC. Do not worry about it, just simply check Don’t ask me again for connections to the PC and click on Connect Anyway.
You can see your remote configurations on your screen. So now you can see the screen of your remote desktop and then start sarin files on your monitor. If you need any other adjustments then go to administration tools and then connection settings in the app. Configure the Appearance and then make the required adjustments needed.


